


Building an MCP Server from Scratch: A Step-by-Step Guide
Introduction
This guide offers a comprehensive walkthrough for building and using your own MCP (Model Context Protocol) server. It covers core concepts, step-by-step implementation, and practical best practices, empowering you to create an AI-driven system that can understand prompts, execute developer tasks, and integrate seamlessly with tools like GitHub.
What is MCP?
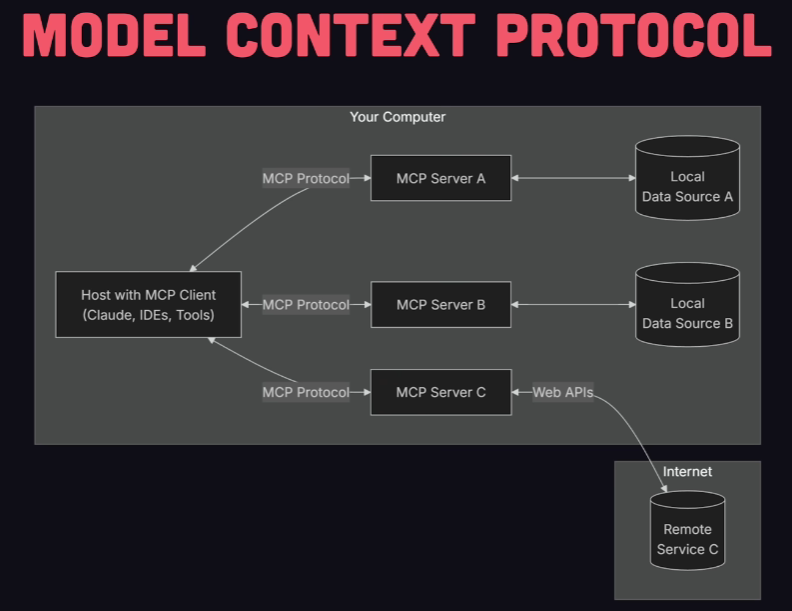
The Model Context Protocol (MCP) is a lightweight, server-side framework designed to serve as the central interface between AI models and developer tools. It enables language models to interpret natural language prompts, generate structured commands (CTAs), and execute tasks like file manipulation, version control, and deployment. By orchestrating workflows and tool interactions, MCP acts as a programmable agent layer that bridges human intent and automated development operations.
How MCP Powers Developer Tools
The Model Context Protocol (MCP) acts as a foundational layer for AI-driven development workflows by bridging the gap between natural language inputs and programmatic execution. It empowers developer tools with structured automation, tool orchestration, and secure integration capabilities.
Capabilities
1. Centralized Tool Integration
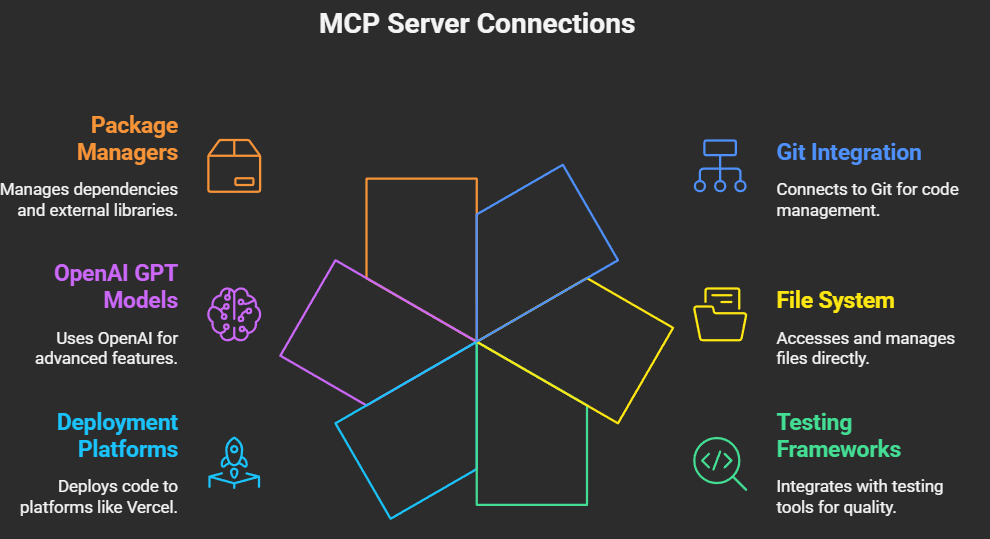
MCP provides a unified API layer that connects various developer tools such as Git, file systems, testing frameworks, deployment services, and more.
2. Authentication and Security Management
MCP manages secure interactions with external services (e.g., GitHub, cloud platforms) using token-based authentication, scoped permissions, and access control mechanisms, ensuring safe execution of operations.
3. Resource Management and File Operations
The protocol enables reading, writing, and modifying files within the project environment. This allows AI models to perform code generation, file restructuring, and content updates with precision.
4. Task Orchestration
MCP allows the model to perform multi-step tasks such as initializing a project, writing code, committing changes, and deploying to production, all from a single prompt. Each task is broken down into structured tool calls that the server can safely execute.
5. Context-Aware Execution
MCP maintains session-level context, allowing the AI to make decisions based on the current state of the project, past actions, or specific environment variables. This improves the quality and relevance of generated responses.
6. Integration with AI Models and Toolchains
By acting as an intermediary between language models and developer tools, MCP enables seamless integration with services such as OpenAI’s GPT models, package managers, CI/CD tools, and deployment platforms like Vercel or Netlify.
7. Modular and Scalable Architecture
MCP is designed to be extensible, allowing developers to add new tools, define custom workflows, and scale the system to support more complex use cases over time.
Integration with AI Models and Toolchains
MCP is designed to be model-agnostic, meaning it can work with various large language models (LLMs) that support function calling or structured data output. It fits into the toolchain by:
- Receiving a request from an application (e.g., a chat interface like Claude Desktop).
- The application, often with the help of an LLM, translates the user’s natural language into a structured MCP tool_call.
- The MCP server validates this call against its registered tools.
- If valid, MCP executes the corresponding tool logic, interacting with databases, APIs, or file systems as needed.
- It then returns a structured response to the application, which can be presented to the user or used by the LLM for further reasoning.
Modular and Scalable Architecture
The protocol promotes a modular design where each tool is a self-contained unit. This allows for:
- Independent Development: Tools can be developed, tested, and updated without impacting others.
- Scalability: MCP servers can be scaled to handle numerous tool executions and concurrent users, often by deploying them as microservices.
- Reusability: Tools defined for one MCP server can potentially be reused across different projects or MCP instances.
Common Use Cases
- Project Bootstrapping: Generating a new project structure, initializing version control, and installing dependencies.
- Code Manipulation: Creating, editing, or refactoring files based on user prompts.
- Version Control Automation: Committing changes and pushing to GitHub directly from natural language instructions.
- Deployment Integration: Triggering deployments via integrated platforms once changes are pushed.
- Agent-Based Development: Enabling persistent developer agents that can reason about the codebase and evolve it over time.
PROJECT OVERVIEW
INVENTORY MANAGEMENT SYSTEM WITH MCP SERVER
- Introduction
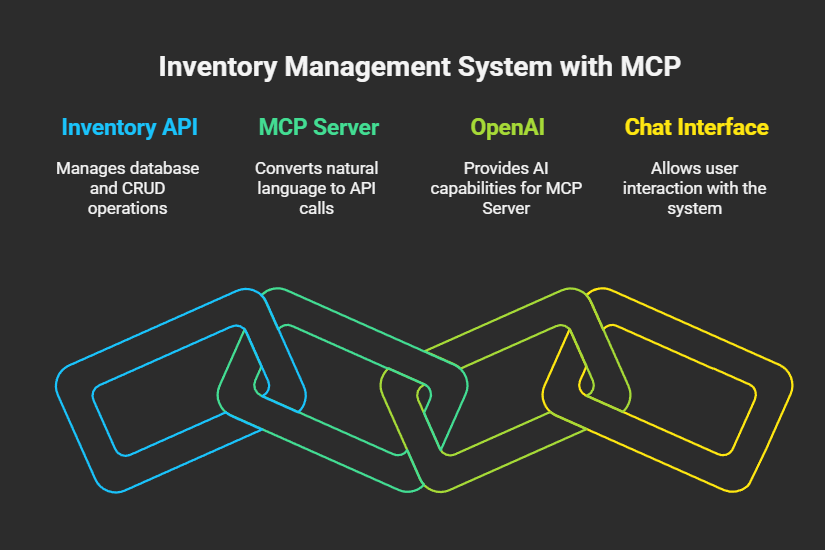
This project presents a robust Inventory Management System (IMS) enhanced with a natural language interface via the Model Context Protocol (MCP). It is designed to streamline inventory operations by integrating traditional RESTful API services with intelligent, AI-driven interactions.
The system comprises two key components:
- Inventory Management REST API Server
- MCP server
- Project Objective
- Develop a Scalable Inventory Management System
Build a full-featured inventory backend with robust Create, Read, Update, and Delete (CRUD) capabilities to manage stock data efficiently. - Enable Natural Language Interaction for Inventory Operations
Integrate natural language processing (NLP) to allow users to interact with the system conversationally, enhancing usability and accessibility. - Implement Model Context Protocol (MCP) with OpenAI
Demonstrate the practical use of MCP to convert natural language inputs into structured API operations through OpenAI’s language models. - Design a User-Friendly Chat-Based Interface
Provide an intuitive and accessible front-end interface that enables non-technical users to manage inventory seamlessly using natural language commands. - Showcase Modern Web API Architecture
Utilize Express.js and MongoDB to highlight best practices in building scalable, maintainable, and well-documented RESTful APIs.
3. Creating Inventory Management Server
Technology Stack
- Node.js: JavaScript runtime environment.
- Express.js: Web application framework for Node.js.
- MongoDB: NoSQL database to store inventory data.
- Mongoose: ODM (Object Data Modeling) library for MongoDB and Node.js.
Creating database:
- Create a collection named “inventoryManagement”
- Create a document named “inventories”
Creating server directory:
- Create a folder and inside it create a “server” directory for our inventory management
- Create a simple node server with command “npm init -y”
Installing Dependencies:
- Install necessary dependencies
npm i cors dotenv express mongooseCreating server.js
This code sets up a basic Express.js server for an Inventory Management System API.
What It Does:
- Loads environment variables using dotenv.
- Connects to MongoDB using a custom connectDB() function.
- Enables CORS and JSON parsing to allow frontend clients to communicate and send JSON data.
- Defines routes under /api/inventory for handling inventory-related API requests (CRUD operations).
- Includes a root route (/) that responds with a status message to confirm the API is running.
- Handles errors globally with a middleware that returns a 500 status for unhandled server errors.
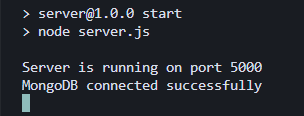
- Starts the server on a specified port (default: 5000) and logs the startup message.
const express = require('express');
const cors = require('cors');
const dotenv = require('dotenv');
const connectDB = require('./dbConnection/db');
const inventoryRoutes = require('./routes/inventory');

dotenv.config();

const app = express();

connectDB();

app.use(cors());
app.use(express.json());

app.use('/api/inventory', inventoryRoutes);

app.get('/', (req, res) => {
    res.send('Inventory Management System API is running');
});

app.use((err, req, res, next) => {
    console.error(err.stack);
    res.status(500).json({ message: 'Something went wrong!' });
});

const PORT = process.env.PORT || 5000;
app.listen(PORT, () => {
    console.log(`Server is running on port ${PORT}`);
});
Creating database connection:
- This code connects the application to MongoDB using Mongoose and logs the connection status.
const mongoose = require('mongoose');
require('dotenv').config();

const connectDB = async () => {
    try {
        await mongoose.connect(process.env.CONNECTION_URL);
        console.log('MongoDB connected successfully');
    } catch (error) {
        console.error('MongoDB connection failed:', error.message);
        process.exit(1);
    }
};

module.exports = connectDB;
Creating model
const mongoose = require('mongoose');

const inventorySchema = new mongoose.Schema({
    name: {
        type: String,
        required: true,
        trim: true
    },
    quantity: {
        type: Number,
        required: true,
        min: 0
    },
    price: {
        type: Number,
        required: true,
        min: 0
    },
    description: {
        type: String,
        trim: true
    },
    category: {
        type: String,
        required: true,
        trim: true
    },
    createdAt: {
        type: Date,
        default: Date.now
    },
    updatedAt: {
        type: Date,
        default: Date.now
    }
});

module.exports = mongoose.model('Inventory', inventorySchema);
Creating .env
- This .env file defines the MongoDB connection URL used to connect to the local database named inventoryManagement.
CONNECTION_URL=mongodb://127.0.0.1:27017Creating controllers
This file defines the controller functions for handling inventory operations in the Inventory Management System. It interacts with the MongoDB database through the Inventory model and includes the following CRUD functionalities:
- getAllItems: Fetches and returns all inventory items.
- getItem: Retrieves a single item by its ID.
- createItem: Adds a new inventory item using data from the request body.
- updateItem: Updates an existing item’s details based on its ID.
- deleteItem: Removes an item from the inventory by ID.
These functions are used as route handlers to respond to client API requests with appropriate status codes and messages.
const Inventory = require('../models/Inventory');

//get all inventory items
exports.getAllItems = async (req, res) => {
    try {
        const items = await Inventory.find();
        res.status(200).json(items);
    } catch (error) {
        res.status(500).json({ message: error.message });
    }
};

//get a single inventory item
exports.getItem = async (req, res) => {
    try {
        const item = await Inventory.findById(req.params.id);
        if (!item) {
            return res.status(404).json({ message: 'Item not found' });
        }
        res.status(200).json(item);
    } catch (error) {
        res.status(500).json({ message: error.message });
    }
};

//create a new inventory item
exports.createItem = async (req, res) => {
    const item = new Inventory({
        name: req.body.name,
        quantity: req.body.quantity,
        price: req.body.price,
        description: req.body.description,
        category: req.body.category
    });

    try {
        const newItem = await item.save();
        res.status(201).json(newItem);
    } catch (error) {
        res.status(400).json({ message: error.message });
    }
};

//update an inventory item
exports.updateItem = async (req, res) => {
    try {
        const item = await Inventory.findById(req.params.id);
        if (!item) {
            return res.status(404).json({ message: 'Item not found' });
        }

        Object.assign(item, {
            ...req.body,
            updatedAt: Date.now()
        });

        const updatedItem = await item.save();
        res.status(200).json(updatedItem);
    } catch (error) {
        res.status(400).json({ message: error.message });
    }
};

//delete an inventory item
exports.deleteItem = async (req, res) => {
    try {
        const item = await Inventory.findById(req.params.id);
        if (!item) {
            return res.status(404).json({ message: 'Item not found' });
        }

        await item.deleteOne();
        res.status(200).json({ message: 'Item deleted successfully' });
    } catch (error) {
        res.status(500).json({ message: error.message });
    }
};
Creating Routes
This file defines the Express router for inventory-related API endpoints. It maps HTTP methods and routes to their corresponding controller functions from inventoryController:
- GET / – Retrieves all inventory items (getAllItems)
- GET /:id – Retrieves a specific item by ID (getItem)
- POST / – Creates a new inventory item (createItem)
- PUT /:id – Updates an existing item by ID (updateItem)
- DELETE /:id – Deletes an item by ID (deleteItem)
It organizes the API routes for clean integration with the main Express application.
const express = require('express');
const router = express.Router();
const {getAllItems,getItem,createItem,updateItem,deleteItem} = require('../controllers/inventoryController');

//Get all inventory items
router.get('/', getAllItems);

//Get a single inventory item
router.get('/:id', getItem);

//Create a new inventory item
router.post('/', createItem);

//Update an inventory item
router.put('/:id', updateItem);

//Delete an inventory item
router.delete('/:id', deleteItem);

module.exports = router;
Start your Server:
- Start your server with “npm start”
Creating Our MCP Server
Creating MCP-Server
- Create a mcp-server directory
- Instantiate a node js server with “npm init -y”
Installing dependencies
npm i dotenv axios @modelcontextprotocol/sdkSetting up Environment Variables:
- Create a .env file
- Put environment variables inside of it
OPENAI_API_KEY=YOUR_API_KEY
INVENTORY_API_URL=http://localhost:5000/api/inventory
Creating server.js
- Setup and Imports
- SDK Imports: You’re importing core Model Context Protocol SDK components needed to define and run a tool server.
- dotenv: Loads environment variables (like API URLs).
- axios: For HTTP communication with your backend inventory system.
import { Server } from '@modelcontextprotocol/sdk/server/index.js';
import { StdioServerTransport } from '@modelcontextprotocol/sdk/server/stdio.js';
import {
  CallToolRequestSchema,
  ListToolsRequestSchema,
} from '@modelcontextprotocol/sdk/types.js';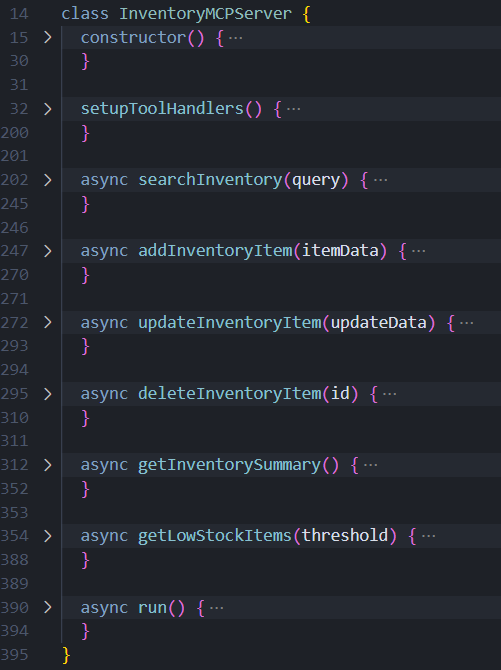
import dotenv from 'dotenv';- Class definition
- Encapsulates all server logic in a class to organize:
- Tool definitions
- Request handling
- API interaction
- Execution
- Server Initialization
- Creates a new MCP server instance
- Reads the inventory API base URL from .env or defaults to localhost
const server = new InventoryMCPServer();- Tool registration
When an MCP client (like Claude Desktop, guided by an LLM) wants to use a tool, it first discovers the available tools, often by fetching them from an endpoint like /mcp/tools. The description and input_schema are critical for the LLM to understand how and when to use each tool and what parameters are needed.
Defines all the available tools the server supports. Each tool includes:
- name
- description
- inputSchema: What parameters are expected
Tools you defined:
- Search_inventory – search inventory items
- Add_inventory – add a new item
- Update_inventory_item – update existing item
- Delete_inventory_item – remove item by ID
- Get_inventory_summary – summary of total items, value, categories
- Get_low_stock_items – Find items below a stock threshold
this.server.setRequestHandler(ListToolsRequestSchema, async () => {
  return {
    tools: [
      {
        name: 'search_inventory',
        description: 'Search for items in the inventory by name, category, or description',
        inputSchema: {
          type: 'object',
          properties: {
            query: {
              type: 'string',
              description: 'Search term to find inventory items'
            }
          },
          required: ['query']
        }
      },
      {
        name: 'add_inventory_item',
        description: 'Add a new item to the inventory',
        inputSchema: {
          type: 'object',
          properties: {
            name: {
              type: 'string',
              description: 'Name of the inventory item'
            },
            quantity: {
              type: 'number',
              description: 'Quantity of the item to add',
              minimum: 0
            },
            price: {
              type: 'number',
              description: 'Price per unit of the item',
              minimum: 0
            },
            category: {
              type: 'string',
              description: 'Category of the item (e.g., Electronics, Food, etc.)'
            },
            description: {
              type: 'string',
              description: 'Optional description of the item'
            }
          },
          required: ['name', 'quantity', 'price', 'category']
        }
      },
      {
        name: 'update_inventory_item',
        description: 'Update an existing inventory item',
        inputSchema: {
          type: 'object',
          properties: {
            id: {
              type: 'string',
              description: 'ID of the inventory item to update'
            },
            name: {
              type: 'string',
              description: 'New name of the inventory item'
            },
            quantity: {
              type: 'number',
              description: 'New quantity of the item',
              minimum: 0
            },
            price: {
              type: 'number',
              description: 'New price per unit of the item',
              minimum: 0
            },
            category: {
              type: 'string',
              description: 'New category of the item'
            },
            description: {
              type: 'string',
              description: 'New description of the item'
            }
          },
          required: ['id']
        }
      },
      {
        name: 'delete_inventory_item',
        description: 'Delete an inventory item by ID',
        inputSchema: {
          type: 'object',
          properties: {
            id: {
              type: 'string',
              description: 'ID of the inventory item to delete'
            }
          },
          required: ['id']
        }
      },
      {
        name: 'get_inventory_summary',
        description: 'Get a summary of all inventory items including total count and value',
        inputSchema: {
          type: 'object',
          properties: {},
          additionalProperties: false
        }
      },
      {
        name: 'get_low_stock_items',
        description: 'Get items that are low in stock (quantity less than specified threshold)',
        inputSchema: {
          type: 'object',
          properties: {
            threshold: {
              type: 'number',
              description: 'Stock threshold - items below this quantity are considered low stock',
              default: 10,
              minimum: 0
            }
          }
        }
      }
    ]
  };
});
- Tool Execution Handler
This maps each tool call to its actual handler function based on the name.
this.server.setRequestHandler(CallToolRequestSchema, async (request) => {......})Example:
case 'add_inventory_item':
return await this.addInventoryItem(args);- Tool logic function
this.server.setRequestHandler(CallToolRequestSchema, async (request) => {
  const { name, arguments: args } = request.params;

  try {
    switch (name) {
      case 'search_inventory':
        return await this.searchInventory(args.query);

      case 'add_inventory_item':
        return await this.addInventoryItem(args);

      case 'update_inventory_item':
        return await this.updateInventoryItem(args);

      case 'delete_inventory_item':
        return await this.deleteInventoryItem(args.id);

      case 'get_inventory_summary':
        return await this.getInventorySummary();

      case 'get_low_stock_items':
        return await this.getLowStockItems(args.threshold || 10);

      default:
        throw new Error(`Unknown tool: ${name}`);
    }
  } catch (error) {
    return {
      content: [
        {
          type: 'text',
          text: `Error executing ${name}: ${error.message}`
        }
      ],
      isError: true
    };
  }
});
Each function handles the corresponding business logic:
searchInventory(query)
- Calls /search?q=query on your backend
- Formats results with availability status
async searchInventory(query) {
try {
const response = await axios.get(${this.inventoryApiUrl}/search, {
params: { q: query }
});
const items = response.data;

if (items.length === 0) {
  return {
    content: [
      {
        type: 'text',
        text: `No items found matching "${query}"`
      }
    ]
  };
}

const results = items.map(item => {
  const status = item.quantity === 0 ? '[OUT OF STOCK]' :
                 item.quantity < 10 ? '[LOW STOCK]' : '[IN STOCK]';
  const totalValue = (item.quantity * item.price).toFixed(2);

  return `${status} ${item.name}\n` +
         `  Category: ${item.category}\n` +
         `  Quantity: ${item.quantity}\n` +
         `  Price: $${item.price}\n` +
         `  Total Value: $${totalValue}\n` +
         `  Description: ${item.description || 'N/A'}\n`;
}).join('\n');

return {
  content: [
    {
      type: 'text',
      text: `Found ${items.length} item(s) matching "${query}":\n\n${results}`
    }
  ]
};
} catch (error) {
throw new Error(Failed to search inventory: ${error.message});
}
}
addInventoryItem(data)
- POSTs a new item to inventory
- Returns formatted success confirmation
async addInventoryItem(itemData) {
try {
const response = await axios.post(this.inventoryApiUrl, itemData);
const newItem = response.data;
const totalValue = (newItem.quantity * newItem.price).toFixed(2);

return {
  content: [
    {
      type: 'text',
      text: `Successfully added "${newItem.name}" to inventory:\n` +
            `  Quantity: ${newItem.quantity}\n` +
            `  Price: $${newItem.price} each\n` +
            `  Total Value: $${totalValue}\n` +
            `  Category: ${newItem.category}\n` +
            `  ID: ${newItem._id}`
    }
  ]
};
} catch (error) {
throw new Error(Failed to add inventory item: ${error.message});
}
}
updateInventoryItem(data)
- PUT request to update a specific item by ID
- Returns confirmation with updated values
  async updateInventoryItem(updateData) {
    try {
      const { id, ...updates } = updateData;
      const response = await axios.put(`${this.inventoryApiUrl}/${id}`, updates);
      const updatedItem = response.data;

      return {
        content: [
          {
            type: 'text',
            text: `Successfully updated "${updatedItem.name}":\n` +
                  `  Quantity: ${updatedItem.quantity}\n` +
                  `  Price: $${updatedItem.price}\n` +
                  `  Category: ${updatedItem.category}\n` +
                  `  Description: ${updatedItem.description || 'N/A'}`
          }
        ]
      };
    } catch (error) {
      throw new Error(`Failed to update inventory item: ${error.message}`);
    }
  }
deleteInventoryItem(id)
- DELETE request to remove item
- Returns basic success message
  async deleteInventoryItem(id) {
    try {
      const response = await axios.delete(`${this.inventoryApiUrl}/${id}`);

      return {
        content: [
          {
            type: 'text',
            text: `Successfully deleted inventory item with ID: ${id}`
          }
        ]
      };
    } catch (error) {
      throw new Error(`Failed to delete inventory item: ${error.message}`);
    }
  }
getInventorySummary()
- Fetches all items
- Computes:
- total items
- total quantity
- total value
- categories
- low/out-of-stock counts
getLowStockItems(threshold)
- Filters inventory to items below the given stock threshold
- Returns a restocking alert summary
  async getLowStockItems(threshold) {
    try {
      const response = await axios.get(this.inventoryApiUrl);
      const items = response.data;

      const lowStockItems = items.filter(item => item.quantity < threshold);

      if (lowStockItems.length === 0) {
        return {
          content: [
            {
              type: 'text',
              text: `No items found with stock below ${threshold}`
            }
          ]
        };
      }

      const results = lowStockItems.map(item => {
        const status = item.quantity === 0 ? '[OUT OF STOCK]' : '[LOW STOCK]';
        return `${status} ${item.name} - ${item.quantity} units remaining`;
      }).join('\n');

      return {
        content: [
          {
            type: 'text',
            text: `LOW STOCK ALERT (threshold: ${threshold})\n\n${results}\n\nTotal items needing restocking: ${lowStockItems.length}`
          }
        ]
      };
    } catch (error) {
      throw new Error(`Failed to get low stock items: ${error.message}`);
    }
  }
7. Server Transport + Startup

- Uses stdio transport to communicate with any MCP client (e.g., CrewAI, Claude, etc.)
- Starts the server and logs a running message
Setting up MCP client
- Downloading claude desktop
- Download the claude desktop app from Download – Claude
- Configuring it for our server
- Go to APPDATA and then claude directory
- Create a claude_desktop_config.json file there
{
  "mcpServers": {
    "inventory": {
      "command": "node",
      "args": ["path to your server.js file"],
      "env": {
        "INVENTORY_API_URL": "http://localhost:5000/api/inventory"
      }
    }
  }
}
Create .gitignore file to hide necessary information
- To hide confidential api keys and information you can use .gitignore file
/server/node_modules
/mcp-server/node_modules
/mcp-server/.env
/server/.env
Test your claude desktop
- Ensure your Inventory API Server is running (cd inventory-api-server && npm start).
- Ensure your MCP Server is running (cd mcp-inventory-server && npm start).
- Open Claude Desktop, ensuring it’s configured to use your MCP server.
Try commands like:
- “Add 50 apples to the inventory.”
- “What’s the current stock of apples?”
- “List all items in stock.”
- “Update the quantity of apples by -5.” (to decrease by 5)
- “Add 10 oranges, price 0.75, category fruit.”
- “Show me all items in the fruit category.”
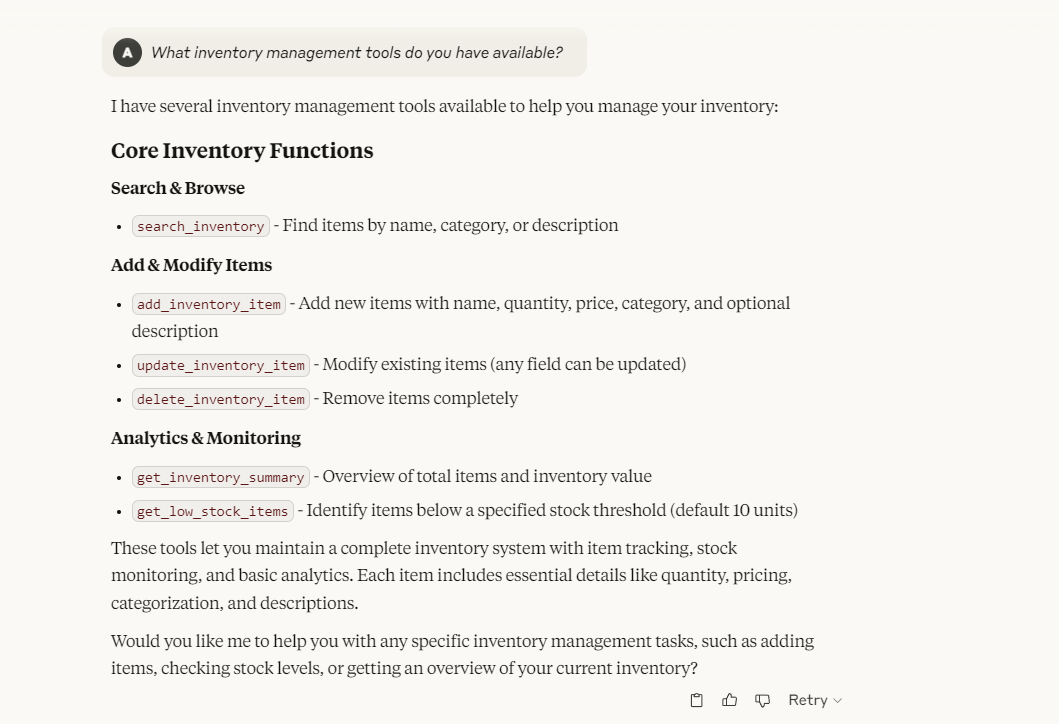
As we can see, our project is connected to claude desktop.
- Try giving it a task

In this setup, Claude acts as an MCP-compatible client that receives natural language instructions from the user—such as “add 20 units of wheat to inventory” or “show me low stock items”—and intelligently interprets these requests into structured tool calls. It then invokes the appropriate tools exposed by the MCP server, such as add_inventory_item, get_inventory_summary, or get_low_stock_items. Claude handles the conversation layer, automatically identifying which tool to call, constructing valid API requests based on the defined JSON schema, and returning human-friendly responses to the user. This creates a seamless bridge between natural language and backend inventory operations, allowing non-technical users to manage inventory through plain conversation.
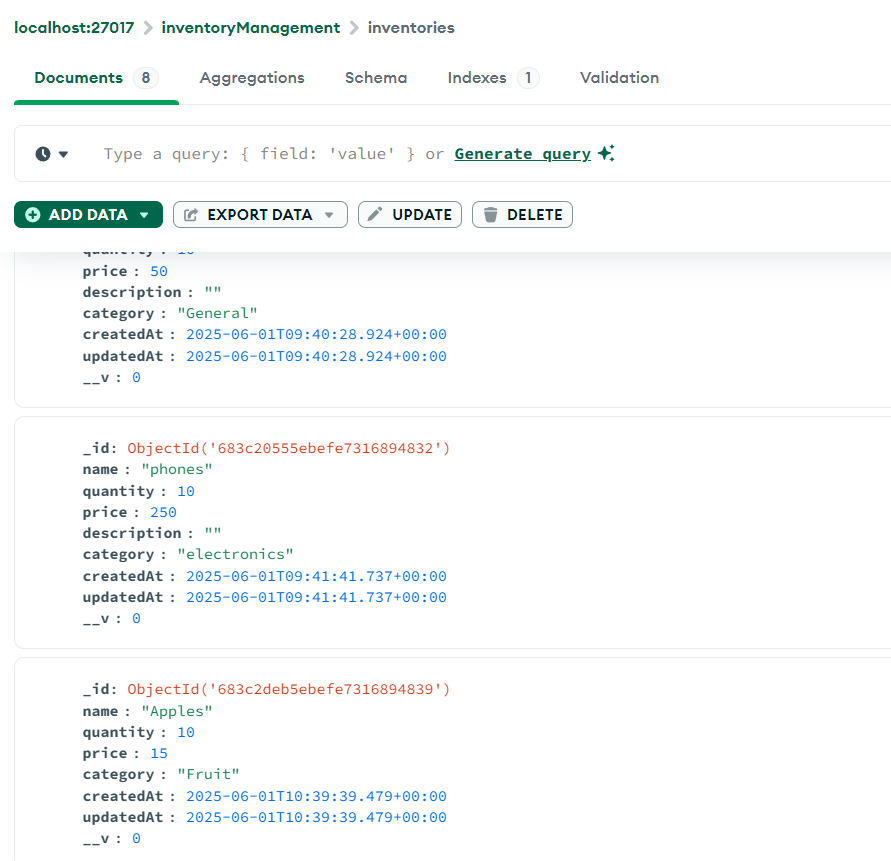
Test your mongodb Database:
- Go to your mongodb compass and check your collection there should be new document added to the database
- Inspect the “inventoryitems” collection (or whatever your model is named) within your “inventory_db” database.
- Verify that items have been added, updated, or deleted as expected.
Congrats! You Successfully Built an MCP Chat Client!
You’ve successfully developed an interactive MCP Chat Client that enables natural language communication with your MCP server. This tool simulates a real-time AI assistant for inventory management, all from the command line.
Call to Action: Future Enhancements
This is just the beginning! To evolve this tool into a more complete and production-ready system, consider working on the following enhancements:
Planned Improvements
- User Authentication and Authorization: Secure the chat system and MCP tool access with login and permission layers.
- Inventory Analytics and Reporting: Provide insights like best-selling items, trends, and value breakdowns.
- Real-Time Notifications for Low Stock: Alert users instantly when stock is critically low.
- Web-Based UI for Inventory System: Build a React/Next.js front-end for a richer user experience with the Inventory API.
- Support for Bulk Operations: Enable uploading CSVs or batch processing multiple items via MCP tools.
- Inventory Categories Management: Allow users to create, edit, and assign categories dynamically through MCP tools.
- Export/Import Functionality for Inventory Data: Let users download and upload inventory in standard formats (CSV, JSON) using MCP.
- More Robust Error Handling: Improve error messages and resilience in both servers.
- Advanced NLU: For more complex queries, the MCP server or client might need more sophisticated Natural Language Understanding capabilities beyond simple keyword matching if the LLM doesn’t fully structure the request.
HAPPY CODING!!!!